Showing posts with label finished product. Show all posts

Wednesday, March 13, 2013

New Ballgown

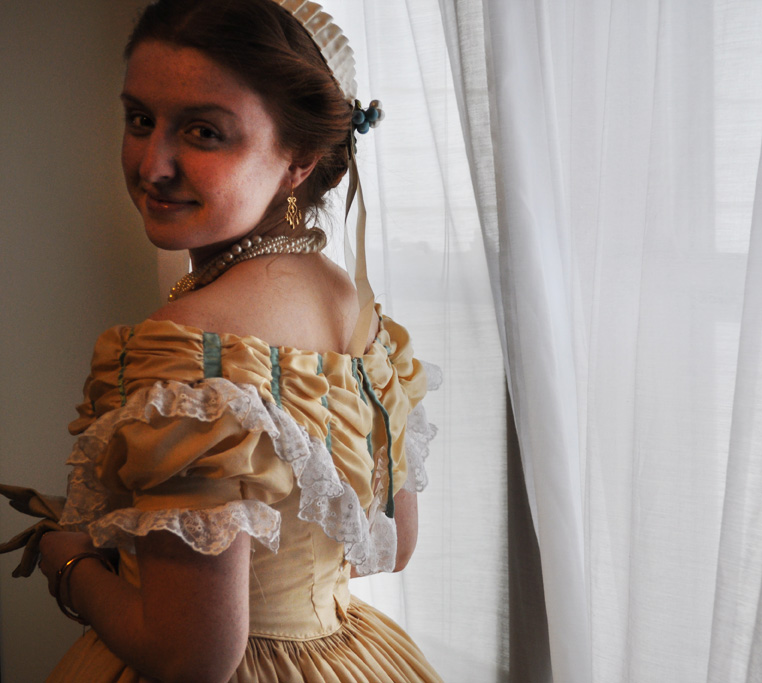
Here at last are photos of my new ballgown, courtesy of my bestie who graciously agreed to a photoshoot during a weekend of crazy homework.

The front, and the bertha-that-I-freehanded-which-
took-a-long-time-but-really-wasn't-that-bad.
Sleeves (which mysteriously got twisted) and the back of
the bertha/bodice/skirt.

Housemates: "If we add a fan, it will be like a legit
modeling shoot!"
Hence, the ruffle blowing in the wind. hahaha

As it was a bit chilly, I donned my great-grandma's fur
wrap to complete my outfit.

This actually wasn't the necklace I ended up wearing, but other than that, this was the ensemble! The dress was enjoyable to wear, and I look forward to pulling it out again for the next ball. Hopefully by that point, I will have added another ruffle or two to the skirt, as was originally intended. It's definitely wearable as-is, but I think at least one more layer on the skirt would be a good thing, and more akin to what I've seen in CDVs and originals.

PROJECT IN SUMMARY:
Fabric: I got 16 yards of silk for $15 + $8 shipping on ebay, and barely used half of it. Lining for the bodice and the kick on the skirt came from the stash.
Notions: Mostly from the stash, plus a few spring steel bones to keep everything smooth. $3
Ribbon: Several yards from Haberman's... maybe another $15 or so
Lace: More from the stash, originally from Hobby Lobby. I really loaded it on, especially on the bertha... maybe 6 yards? (Do you like my super meticulous bookkeeping?)
TOTAL: $30ish. Not too bad for a new silk ballgown!

Sunday, November 25, 2012

Thanksgiving and a Cravat

The title pretty much sums it up. Between going home, the Thanksgiving festivities, a smattering of other events, and still trying to cram in as much homework as possible, I stayed pretty busy this weekend!

As I positively pine away for sewing while I'm at school, I did fit a few quick projects in while I was home. The first was to hem up a little tree skirt for my mom, which emerged out of a remnant from her stash. After that, the sewing machine was out and threaded, so I decided to keep going. I wanted to make a few cravats for my brother (he just started reenacting, and I couldn't resist the irony of giving him "ties" for Christmas) so I went to the great wealth of knowledge that is the internet and tracked down a tutorial. I found a marvelous one from Sarah over at Romantic History (check it out here!), and after tweaking it a little for a different look, here is the result!

I am quite in love with it!

For the fabric, I used a remnant from my Swiss Body project. The burgundy/black changeable taffeta looks quite sharp in cravat form! It still wants a neckband... I'll add one after I give it to him, to make sure that it will be the right length. I'm planning on making a similar one for myself, too, to wear with the Swiss Body of the same color. It was a quick project--I'd say easily under an hour, even though it was my first one. I'll definitely be making more... lots more! I have a whole stack of fabrics that are now waiting to be transformed into a colorful variety of cravat shapes. Stripes, solids, prints, plaids, single bow, double bow, loose ends, small, large, wide, thin... the possibilities are endless! I have a feeling that my brother will soon have a different necktie for every day of the month. I hope he likes them ;)

Tuesday, October 30, 2012

Wolcott Mill!

Providence shone upon me this year in the form of scheduling, and placed my fall break and the Wolcott Mill reenactment on the same weekend. Usually, Wolcott is the weekend before and coincides with midterms, which puts attending pretty much out of the question. So while I wasn't able to camp this year, I was able to daytrip out for part of Saturday! It was chilly and damp, but I was just thrilled to be dressed and at an event.

Since I haven't done any fall events before, my entire wardrobe is geared for summer weather. I decided to wear the "Black Hole" dress, and accessorized with a pashima shawl, kid leather gloves, a black velvet belt with a mother of pearl buckle, a jet and gold brooch, my little reticule, and my new boots from Jackson. In order to stay warm in my thin cotton, I cheated a bit and layered a black long-sleeved shirt under the dress. I also lived on the scandalous side and went without a bonnet or hat, as it was unseasonably late for straw, and I haven't gotten around to making anything of silk or wool yet. One of these days!

The whole ensemble!

The military portrayed the Battle of Sheperdstown, fought just after Antietam in September of '62. I was there for Part I, by the end of which the Union had swept the field. (According to my history, however, the ultimate victory in Part II went to the South.)

The Confederate skirmish line towards the beginning of the battle.

Overall, it was a lovely event. I hope to camp for this one after I'm done with college and can take a weekend away without worrying about the piles of homework I'm leaving behind. Until then, I'll have to start in on some warmer clothes. My purple plaid is pretty thick. If I let out the hem on that (which I have to do anyhow) and make a coat/cloak, hood, muff, and some flannel underpinnings, I should be ready to brave the October weather!

Sunday, October 28, 2012

New Corset!

[Sorry for the long hiatus! I've been totally swamped with school, but now have a few posts to put up. This one's been written up in the queue for a while, but I just now finally got around to sticking the pictures in.]

Towards the end of the summer, I put on my corset to get ready to docent at my historical village, for which I dress to the Civil War era. I snapped the busk together and proceeded to pull on the lacing. Without too much tugging it stopped tightening, but wasn't nearly snug yet. I checked in the mirror, and sure enough, it had finally laced up all the way in the back with room to spare. Not good! With the Jackson reenactment approaching (the enormous crowning jewel of the summer reenacting season) I did not want to be parading around in an ill-fitted corset, which correspondingly would not support my back and hoop. So I finally got on the ball, and called up my friend to help me whip up a new one. It was a bit of a whirlwind, (hence scant/nonexistent process photos) but here is the general rundown of the project:

Stage 1: Mockup
Pretty self explanatory. I used my friend's pattern as we're a similar size (I'm a little shorter and rounder, but it worked just the same) and cut out the mockup in a fabric that doesn't stretch. I was confused as to fitting something with two closures with a projected gap in the back. Solution: sew a 2"-3" strip in the back where you want the lacing gap to be, and fit the rest as usual. Brilliant!

Many, many pins in the mockup!

Stage 2: Cut out all 34857 pieces
Seriously, there are that many. Gussets here, gussets there... and every piece needs to be cut out in all of the different fabric types. (Lining, canvas, and outer fabric, with more optional fashion fabric.) Snip away!

Stage 3: Sew all 34857 pieces together
3a. Sewed canvas and lining together
3b. Assembled attached canvas and lining
3c. Assembled fashion/outer fabric... partially.

Stage 4: Boning and Busk
Boned the lining/canvas pieces, then attached the outer fabric and stuck the busk in. Not necessarily in that order. This stage closely resembled total chaos. I wound up with a 12" busk, and I think I ended up using 26 or 28 bones total.

Stage 5: Grommets
Ahh. Something I already knew how to do, at last. I used some borrowed awls to make the holes, to avoid fraying that would come from punching holes. Then I stuck in 30 grommets with the Crop-O-Dile that I have stolen from my mom for a countless number of projects.

Stage 6: TRY IT ON NOW
For real. So important! Mine ended up getting a full couple of inches longer after it was boned. Like, I-can't-sit-down-in-this-long. A few bones also hit in uncomfortable spots. (ie. jabbing me in the armpit and causing me to permanently hunch my shoulders. Not good!) My dear brother and father cut the bones down to the proper length, and I was able to adjust things so that it fit well. Crisis averted... fortunately before there was casing to rip off!

Stage 7: Casing
I admit, I did not do this stage justice. It was the last step and was getting close to the event. (Like, "four hours" close.) So I whipped some bias-cut canvas casing on with the machine, bent two sewing machine needles by going too close to some bones, and got it together enough to wear.

Stage 8: Lace it all up
I like mine laced in three sections, so that I can easily get it on and off myself as I often have to dress without assistance. I'm not sure how accurate that system is, but hey, it's not visible anyhow! I ended up with 15 grommets per side, which neatly divided into sections of 5 pairs per lace. (I ended up using around 8 yards of lacing, but could have definitely gotten away with 7. Better safe than sorry, though... trimming is always an option!)

Stage 9: Look fabulous, in increased comfort!
I love my new corset! It was in places tricky, tedious, and a little frustrating, but all in all it was very worth it. If it comes down to it again, I'll definitely make another one over buying it.

And here, finally, are some photos!

The finished product. Off, it looks pretty shapeless.
But it's not!!

Purple stitching!

Business on the outside...

Party on the inside! I was talked into using my plaid
mockup as a colorful lining. Here, you can partially see
where I ended up putting my bones. 

EDIT: When I made the corset in August, there was a beautiful, perfect 2-inch gap down the back. I have since lost more weight, and now my new corset is lacing all the way up, too! Agh! I'm happy to have thinned down, though... I can always make adjustments. The side seams are still raw, so I'll probably start by pulling those in a bit where they're not too close to the bones.

Friday, September 7, 2012

Surprise!! A Shot of the Finished August '62 Outfit!

You thought I forgot, didn't you? Well maybe I did. Of course I didn't! Here, at long last, is the Plaid Skirt/Swiss Body/Garibaldi Blouse outfit all together!

Lookin' a little rough at the end of Jackson, there...

I finally got an okay shot of it all together. (It's pretty impossible to assemble correctly on the dressform, as the Swiss Body is so exactly shaped, and my form has no shoulders.) The other times I've worn it, the sleeves were rolled down and buttoned, and I had a little burgundy velvet bow at my neck like in the original plate. (In other words, it looked a lot closer to the original inspiration!)  Also, the picture makes the skirt look oddly small, whereas in reality it's HUGE. But here you can get the idea!

Verdict: LOVE IT!! It's a comfortable, fun outfit to wear. The taffeta in the skirt is stiff enough where if it's hot, I can get away with no over-petticoat. The waist is only about half-boned, but at that it lays nicely and I have no bunching problems. Next time I'm going to pin the blouse down to the skirt though, as it kept bunching up when I raised my arms. (Hence, the bunchy top of the blouse sticking up in the photo.) All in all though, I'm a major fan. I made the swiss body by making a toile of my ballgown bodice and doing some serious carving to get down to the shape I wanted, and shifted the lace-up to the front. Worked like a charm! You can't see it here, but the blouse is a sheer and solid white stripe, which was a curtain in a previous life. Nice and light... but I really should make a corset cover to go with it. *Adds it to the list*

Total project cost:
Blouse:
Old curtain: $2 at a garage sale
Buttons: Stash
Total: $2 and change
Swiss Body:
Burgundy/Black shot taffeta (stash, originally around $6 at Jo-Ann's red tag sale)
Grommets (also stash)
Ribbon lacing (also stash)
Boning (also stash!)
Total: Free from the stash!
Plaid Taffeta Skirt:
Taffeta: Jo-Ann's red tag again! $16 for 4 yards
Velvet Trim: Some stash, had to order about $4 more
Hook and Bar closure: (stash)
Total: $20
Outfit Grand Total: $22

For all of the pieces that it needed, this outfit went together very inexpensively! Here's the original fashion plate again, from August of '62. I was in high style sporting something out of this month's Godey's!