Showing posts with label reenacting. Show all posts

Wednesday, March 20, 2013

Kalamazoo 2013!

While it's been a busy semester, it just wouldn't be March without...
THE KALAMAZOO LIVING HISTORY EXPO!

I was very well behaved/didn't too much shopping this time, but I did pick up a few things to get me started for the new season. I purchased some lovely brown leather gloves, some super sheer striped cotton for new undersleeves (I've been wanting sheer ones for a while now), period correct knitting needles (which have also been on the wishlist), and some scissors for my brother's housewife kit (he's had an IOU for them since Christmas). I strongly considered straw for a new bonnet, but seeing as I'm already up to my elbows in projects without much time to do them, I decided to put off the bonnet at least until I've finished a few more items on the list.


All in all, I'd say it was a successful trip!

Wednesday, March 13, 2013

New Ballgown

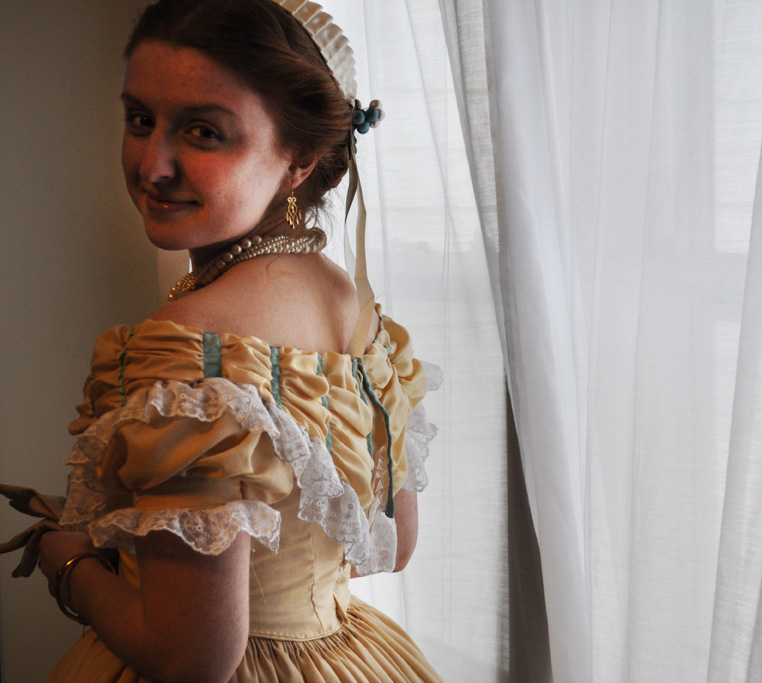
Here at last are photos of my new ballgown, courtesy of my bestie who graciously agreed to a photoshoot during a weekend of crazy homework.

The front, and the bertha-that-I-freehanded-which-
took-a-long-time-but-really-wasn't-that-bad.
Sleeves (which mysteriously got twisted) and the back of
the bertha/bodice/skirt.

Housemates: "If we add a fan, it will be like a legit
modeling shoot!"
Hence, the ruffle blowing in the wind. hahaha

As it was a bit chilly, I donned my great-grandma's fur
wrap to complete my outfit.

This actually wasn't the necklace I ended up wearing, but other than that, this was the ensemble! The dress was enjoyable to wear, and I look forward to pulling it out again for the next ball. Hopefully by that point, I will have added another ruffle or two to the skirt, as was originally intended. It's definitely wearable as-is, but I think at least one more layer on the skirt would be a good thing, and more akin to what I've seen in CDVs and originals.

PROJECT IN SUMMARY:
Fabric: I got 16 yards of silk for $15 + $8 shipping on ebay, and barely used half of it. Lining for the bodice and the kick on the skirt came from the stash.
Notions: Mostly from the stash, plus a few spring steel bones to keep everything smooth. $3
Ribbon: Several yards from Haberman's... maybe another $15 or so
Lace: More from the stash, originally from Hobby Lobby. I really loaded it on, especially on the bertha... maybe 6 yards? (Do you like my super meticulous bookkeeping?)
TOTAL: $30ish. Not too bad for a new silk ballgown!

Friday, February 22, 2013

Ballgown Sneak Peek!

I'll be debuting my new ballgown TOMORROW at the Midwinter's Ball in Lansing! *happy dance*

Here are a few detail shots... pictures of the whole dress coming soon.

Bertha!

Lace on the sleeves

The ill-conceived skirt ruffle

I can't wait to put it all on together and see what it looks like! Living on the edge here, having never worn the dress until the day of the ball...

Sunday, January 27, 2013

It's Ballgown Time!

Note: these posts are being written up with a delay... I didn't get to posting them over break, but have a good chunk of the dress done.

I had been lusting over the pink ballgown for ages, (you know, the one I kept posting pictures of) but had had no luck in finding fabric for it. Wrong weight, wrong color, wrong sheen... I just couldn't get the correct tone, and didn't want to compromise and ruin my vision of the dress. Someday it will be mine--but for now, I am working on another ball gown!

I had been scouring ebay for fabric for ages when I found... IT. Sixteen yards of bone colored, 34"w antique silk. "Good heavens, that must have been extortionately expensive!" you must be thinking. Try $15.50 with $8 shipping. That's right, folks... all the yards I could wish for of high quality vintage stock for a little over a dollar a yard! I won the bid almost without contest. I was close to doing a victory dance, but didn't want to scare my roommate.

What do I do with this glorious good fortune? Well, that shouldn't come as a surprise... it's ballgown time! It's a very light, soft fabric, so anything very structured is out of the question.

Here is my chief inspiration at present:

2012-08-25 KSMF - Sheer white cotton dress with blue satin sash (French), circa 1860.
So light and feminine!

I plan to add more of the contrasting color, and may do a point on the bodice. (I like the ribbon around the waist, but neglected to get the proper width of ribbon while I was at Haberman's, and don't have time for another trip. Rats!) I like the ruffles around the bottom of the skirt. I was originally planning on tiers, but liked the subtlety of the ruffles and how they show off the delicacy of the fabric. Currently, the skirt is made, and the first ruffle is almost ready to attach. Let me tell you... it is taking FOR. EVER. I don't know why, but this project is crawling along at a snail's pace. A tired snail. A tired snail with no motivation. Maybe it's just because I've been so busy otherwise, but still! The bodice is basically stitched together too, but still needs to have hooks and eyes, boning, and piping. So basically everything. 

Pictures of the progress coming soon... hopefully. You know how that goes. First full week of classes coming up... yikes!

Thursday, November 15, 2012

Flirtation, Victorian Style

Whew, I submitted my biggest term paper of the semester last night. In Mother Russia, research projects finish you! (I love my Russian History class, but... dang.) 

In the light spirit which this places me, here's an interesting alternative to flirting with a fan. I present to you: how to flirt with gloves, a handkerchief, and a parasol! Darn, if only the guys knew this code too... I would be the biggest flirt in camp!*

The Victorian flirting code. Very useful for spies in love.

I really love the flirting codes, language of flowers, etc. Sending someone ambrosia and celandine or skilfully wielding a handkerchief beats out sending a text message any day of the week.

*actually not true

Friday, November 9, 2012

Corset Cover Research

I really need a corset cover to go under my Garibaldi. The way my old corset was made, it didn't peek up much under my Swiss Body. My chemise served just fine as the underbodice, so I never worried about it overmuch. However, my new corset is cut a good inch or two higher in the front, and consequently shows. Thus, I have been looking for a style of corset cover to pattern something after when I'm on break, and can buckle down and make one. Here are some images I've come across that I really like! (Found on Google images and Pinterest.)

Corset Cover
Cool sleeves! But would they get bunchy?

corset cover
I like the huuuge trim on this one! And also the
wide decolletage.

I like these two a lot, and plan to do something toward one or the other. They both have a nice shape, and the lace adds some nice decoration without adding loads of time.

I'll probably *coughdefinitelycough* go with something simpler that doesn't involve hours of embroidery, but I loved these other examples I found and had to post them.

The corset cover
1869. So, a little late. But super cute!

Corset Cover, 1870s
From the '70s, so it's also a little late,
but DANG! I want it. A lot.

Tuesday, October 30, 2012

Wolcott Mill!

Providence shone upon me this year in the form of scheduling, and placed my fall break and the Wolcott Mill reenactment on the same weekend. Usually, Wolcott is the weekend before and coincides with midterms, which puts attending pretty much out of the question. So while I wasn't able to camp this year, I was able to daytrip out for part of Saturday! It was chilly and damp, but I was just thrilled to be dressed and at an event.

Since I haven't done any fall events before, my entire wardrobe is geared for summer weather. I decided to wear the "Black Hole" dress, and accessorized with a pashima shawl, kid leather gloves, a black velvet belt with a mother of pearl buckle, a jet and gold brooch, my little reticule, and my new boots from Jackson. In order to stay warm in my thin cotton, I cheated a bit and layered a black long-sleeved shirt under the dress. I also lived on the scandalous side and went without a bonnet or hat, as it was unseasonably late for straw, and I haven't gotten around to making anything of silk or wool yet. One of these days!

The whole ensemble!

The military portrayed the Battle of Sheperdstown, fought just after Antietam in September of '62. I was there for Part I, by the end of which the Union had swept the field. (According to my history, however, the ultimate victory in Part II went to the South.)

The Confederate skirmish line towards the beginning of the battle.

Overall, it was a lovely event. I hope to camp for this one after I'm done with college and can take a weekend away without worrying about the piles of homework I'm leaving behind. Until then, I'll have to start in on some warmer clothes. My purple plaid is pretty thick. If I let out the hem on that (which I have to do anyhow) and make a coat/cloak, hood, muff, and some flannel underpinnings, I should be ready to brave the October weather!

Sunday, October 28, 2012

New Corset!

[Sorry for the long hiatus! I've been totally swamped with school, but now have a few posts to put up. This one's been written up in the queue for a while, but I just now finally got around to sticking the pictures in.]

Towards the end of the summer, I put on my corset to get ready to docent at my historical village, for which I dress to the Civil War era. I snapped the busk together and proceeded to pull on the lacing. Without too much tugging it stopped tightening, but wasn't nearly snug yet. I checked in the mirror, and sure enough, it had finally laced up all the way in the back with room to spare. Not good! With the Jackson reenactment approaching (the enormous crowning jewel of the summer reenacting season) I did not want to be parading around in an ill-fitted corset, which correspondingly would not support my back and hoop. So I finally got on the ball, and called up my friend to help me whip up a new one. It was a bit of a whirlwind, (hence scant/nonexistent process photos) but here is the general rundown of the project:

Stage 1: Mockup
Pretty self explanatory. I used my friend's pattern as we're a similar size (I'm a little shorter and rounder, but it worked just the same) and cut out the mockup in a fabric that doesn't stretch. I was confused as to fitting something with two closures with a projected gap in the back. Solution: sew a 2"-3" strip in the back where you want the lacing gap to be, and fit the rest as usual. Brilliant!

Many, many pins in the mockup!

Stage 2: Cut out all 34857 pieces
Seriously, there are that many. Gussets here, gussets there... and every piece needs to be cut out in all of the different fabric types. (Lining, canvas, and outer fabric, with more optional fashion fabric.) Snip away!

Stage 3: Sew all 34857 pieces together
3a. Sewed canvas and lining together
3b. Assembled attached canvas and lining
3c. Assembled fashion/outer fabric... partially.

Stage 4: Boning and Busk
Boned the lining/canvas pieces, then attached the outer fabric and stuck the busk in. Not necessarily in that order. This stage closely resembled total chaos. I wound up with a 12" busk, and I think I ended up using 26 or 28 bones total.

Stage 5: Grommets
Ahh. Something I already knew how to do, at last. I used some borrowed awls to make the holes, to avoid fraying that would come from punching holes. Then I stuck in 30 grommets with the Crop-O-Dile that I have stolen from my mom for a countless number of projects.

Stage 6: TRY IT ON NOW
For real. So important! Mine ended up getting a full couple of inches longer after it was boned. Like, I-can't-sit-down-in-this-long. A few bones also hit in uncomfortable spots. (ie. jabbing me in the armpit and causing me to permanently hunch my shoulders. Not good!) My dear brother and father cut the bones down to the proper length, and I was able to adjust things so that it fit well. Crisis averted... fortunately before there was casing to rip off!

Stage 7: Casing
I admit, I did not do this stage justice. It was the last step and was getting close to the event. (Like, "four hours" close.) So I whipped some bias-cut canvas casing on with the machine, bent two sewing machine needles by going too close to some bones, and got it together enough to wear.

Stage 8: Lace it all up
I like mine laced in three sections, so that I can easily get it on and off myself as I often have to dress without assistance. I'm not sure how accurate that system is, but hey, it's not visible anyhow! I ended up with 15 grommets per side, which neatly divided into sections of 5 pairs per lace. (I ended up using around 8 yards of lacing, but could have definitely gotten away with 7. Better safe than sorry, though... trimming is always an option!)

Stage 9: Look fabulous, in increased comfort!
I love my new corset! It was in places tricky, tedious, and a little frustrating, but all in all it was very worth it. If it comes down to it again, I'll definitely make another one over buying it.

And here, finally, are some photos!

The finished product. Off, it looks pretty shapeless.
But it's not!!

Purple stitching!

Business on the outside...

Party on the inside! I was talked into using my plaid
mockup as a colorful lining. Here, you can partially see
where I ended up putting my bones. 

EDIT: When I made the corset in August, there was a beautiful, perfect 2-inch gap down the back. I have since lost more weight, and now my new corset is lacing all the way up, too! Agh! I'm happy to have thinned down, though... I can always make adjustments. The side seams are still raw, so I'll probably start by pulling those in a bit where they're not too close to the bones.

Friday, September 7, 2012

Surprise!! A Shot of the Finished August '62 Outfit!

You thought I forgot, didn't you? Well maybe I did. Of course I didn't! Here, at long last, is the Plaid Skirt/Swiss Body/Garibaldi Blouse outfit all together!

Lookin' a little rough at the end of Jackson, there...

I finally got an okay shot of it all together. (It's pretty impossible to assemble correctly on the dressform, as the Swiss Body is so exactly shaped, and my form has no shoulders.) The other times I've worn it, the sleeves were rolled down and buttoned, and I had a little burgundy velvet bow at my neck like in the original plate. (In other words, it looked a lot closer to the original inspiration!)  Also, the picture makes the skirt look oddly small, whereas in reality it's HUGE. But here you can get the idea!

Verdict: LOVE IT!! It's a comfortable, fun outfit to wear. The taffeta in the skirt is stiff enough where if it's hot, I can get away with no over-petticoat. The waist is only about half-boned, but at that it lays nicely and I have no bunching problems. Next time I'm going to pin the blouse down to the skirt though, as it kept bunching up when I raised my arms. (Hence, the bunchy top of the blouse sticking up in the photo.) All in all though, I'm a major fan. I made the swiss body by making a toile of my ballgown bodice and doing some serious carving to get down to the shape I wanted, and shifted the lace-up to the front. Worked like a charm! You can't see it here, but the blouse is a sheer and solid white stripe, which was a curtain in a previous life. Nice and light... but I really should make a corset cover to go with it. *Adds it to the list*

Total project cost:
Blouse:
Old curtain: $2 at a garage sale
Buttons: Stash
Total: $2 and change
Swiss Body:
Burgundy/Black shot taffeta (stash, originally around $6 at Jo-Ann's red tag sale)
Grommets (also stash)
Ribbon lacing (also stash)
Boning (also stash!)
Total: Free from the stash!
Plaid Taffeta Skirt:
Taffeta: Jo-Ann's red tag again! $16 for 4 yards
Velvet Trim: Some stash, had to order about $4 more
Hook and Bar closure: (stash)
Total: $20
Outfit Grand Total: $22

For all of the pieces that it needed, this outfit went together very inexpensively! Here's the original fashion plate again, from August of '62. I was in high style sporting something out of this month's Godey's!


Thursday, September 6, 2012

Jackson!!!

The Jackson Civil War Muster is the biggest event in the state (maybe even Great Lakes region?). It's big. And fun. While it isn't as picturesque as Greenfield Village, or as across-the-board accurate as Charlton Park, it's still a great event. It's the place to be if you're looking to do some shopping at the sutlers. And the battles... aghh the battles! They definitely rank at the top of the local events I've seen. The park re-landscapes the field each year for the selected engagement. In years past, they've grown corn and wheat, dug out huge embankments, and lined up trenches to name a few things. This year the landscaping was pretty tame. The battles represented were 2nd Manassas and Stones' River. New as of this year, they split the battles into two phases, one early in the action and the other showing the conclusion of the conflict. It was a nice effect, as it gave a better feel for the whole thing and how it was won or lost. My favorite part was during 2nd Manassas, when the Confederates ran out of ammunition and repelled a charge by throwing rocks, which was a first among the reenacted battles I've seen!

The guest of honor on Saturday was Mr. Harold Becker, whose father fought in the Civil War. Nope, that's not a typo: his father was in the war 150 years ago. "How?!" you ask. His father, who lied about his age in order to enlist, was 71 years old when Mr. Becker was born in 1917. Thus, the 150-year bridge. Awesome? Awesome.

Mr. Becker, me, and my handsome bro-han.

As I mentioned, the sutlers at Jackson are quite numerous. I didn't do too much in the way of purchasing, but did get a new pair of boots which I have been badly needing, and a small gold [can't remember name!!] to fill with lavender and hang from my belt :)

Aren't they cute! They're quick to get on and off, too :)

It's pretty tiny--only about 1" across!

And now, I can't wait for the next event! I was hoping to hit Wolcott Mills in October, but it's not looking good judging by the syllabi I have been receiving this week. Hopefully I can still at least daytrip!

Thursday, August 30, 2012

Parasol Photos and Jackson!

Well, I fell off the face of the earth for the past week and a half. Sorry for the long wait on the parasol photos... here they are, in abundance! It was a nice day, so I trotted outside with Oswald (my faithful camera) and had a shoot.


Ta-daaa! This parasol is like my child ;*)

The still-bunchy insides :/

Folded up and ready to hit the road!

I can't get over the original lace!

The end. (Pun intended!)

The lining still isn't the best [insert understatement of the century] so I'll probably end up fiddling with it some more, eventually. For now, it keeps the sun off and looks super stylish, so I'm satisfied with that! Many ladies were quite envious of my Chantilly shade :)

The Jackson reenactment was this past weekend, which accounts for my absence. In the past couple of weeks, I have:
- Recovered the parasol
- Finished The Epic Striped Wrapper
- Re-set the cartridge pleating on the skirt of the blue and white plaid
- Boned the burgundy Swiss body
- Other miscellaneous maintenance and adjustments
- Made an entire new corset

Surprise! Yes, I just cranked out my first Victorian corset. The one I was wearing didn't fit too great (as it wasn't fit to me) and was too large to the point where it laced up all the way in the back and was still not nearly as tight as it should be. My very knowledgeable friend came over for a few sewing sessions/lessons and showed me how it was done. Look for another post about the corset experience after the JACKSON post, which will be next :) So many posts in the queue right now... be excited!!

Wednesday, August 8, 2012

The Parasol of Destiny!

When I first started reenacting, I didn't realize how crucial it was to have a parasol. Laugh if you will--it's pretty much a necessity! Once you've used one for ten minutes and realized that having your own portable shade cools you off a solid ten degrees, you're spoiled for good. I've been meaning to get one for a while now, but hadn't run across any in the right style/price. Finally, I caved: I had some birthday money, and was getting one before my next event no matter what! I stalked eBay for a while, until I found... IT. The parasol.


I've always loved the lace ones, but they're always significantly more expensive than their plain silk counterparts. This one, with the carved handle to boot, was the most spectacular one I'd seen up for sale anywhere near the double digit price range. I stayed up late until the bidding came to a close, and won it for only $65!

I then ran around the house and told my brother how fashionable I was about to be approximately 62 times. It finally came the other day, and now I have to set to work on it so it's ready for Jackson at the end of the month. The ivory silk needs to be completely replaced, but the original lace is in very good shape minus a smattering of small holes that can be easily fixed.

Here are a few more shots of it, because I'm in love:


The underside, showing off the carved
handle and the lining.

Even the finial is carved all fancy-like!

Isn't it delightful!
(This shot makes the lace overhang
look longer than it really is.)

I've seen other originals lined in a light pink, and am considering something along those lines, depending on how ambitious I'm feeling once I reach the fabric store. A trip to Haberman's in Royal Oak tomorrow should supply me with the necessary materials... now if I can only get the pattern mock-up to go smoothly!

Progress posts will be made. Stay tuned! :)

Friday, July 27, 2012

Hastings/Charlton Park Report

Well, it would seem that blogger ATE the Charlton Park post I put up before, so I shall write another. The internet cannot prevent me from proclaiming my love for this event!

The event last weekend was one of my favorites of all time. Great company, epic battles, a short appearance at a barn dance, varietous scenarios, and a more relaxing atmosphere than usual made it more than memorable. Out of the photos that have popped up on facebook, here are my favorites! They were taken by TGDavison Photography. Check out the rest of his Hastings photos here... they're amazing!


Here's my newly trimmed blue plaid in action! You can't see the sleeves very well, but get the general idea.


This is my favorite picture of the weekend--it shows my dear friend's nephew-to-be impressing me with his ability to spot colors. I'm wearing my green linen weave striped dress with the pagoda sleeve day bodice. (It has an evening bodice too, for less formal parties and dances that don't quite warrant a ballgown.) On top is... THE APRON!! It still needs one star, but close enough was close enough... I wanted to wear it! I donned it for almost the entire weekend, and it generated a not inconsiderable amount of comment. It was the only patriotic apron I saw at the event, which was surprising given that there was quite a rash of them last year. Either way, I am quite in love with it!

All in all, it was a more than successful weekend. I'll definitely be back... thank you Charlton Park for a great event!

Friday, June 29, 2012

The 18thC Bug Strikes Again!

This summer, I've been volunteering at a local museum and working with their exhibits group. We just finished our newest exhibit, which focuses on the First Ladies. For the opening last night, they had a few costumed interpreters dressed like first ladies, and I was asked to be Abigail Adams! (Coincidentally my favorite first lady... :D) A lovely woman whom I know from both the museum and reenacting lent me a complete 18thC outfit, including underpinnings and a silk dress she made, and *drumroll* a cap, fichu, pearl wedding necklace, and earrings THAT WERE ALL ORIGINAL PIECES FROM THE 1770s!!!!! I was so excited I almost passed out. In this awesome ensemble, I wandered around the museum and told visitors about my famous husband and son, and my time in the White House. My family and a friend even came to see me! All in all, it was a wonderful evening.

Chilling with my pals Martha Washington and Dolley Madison
Photo Credit: John McKay at the Plymouth Canton Patch
(To see the rest of the article, go here.)


But now...

My pining after my very own 18thC outfit has grown to become unbearable. I went to the custom corset pattern generator (link!) earlier, which I've had in the back of my mind for some time now, and made myself a pattern for stays. They're a little early for Rev War, but should do the trick of squashing me flat as a board without too much trouble or the cost of another pattern. I then found a piece of fabric that was exactly the right size and weight in my stash, which was left over from making my Civil War reticule. Destiny? I think so. It's a lovely thick teal moiree, which I think will look stunning with the white binding I'm planning. I am lining the stays with the ticking fabric that I recently found in the JoAnn's remnant bin. (At about $6 for 3/4 yard, I couldn't resist. I have a longstanding love affair with ticking fabric, and no idea why.) I knew it would come in handy--it's a bit sturdier than most cottons, and I expect it to wear up decently well. I may still have to stick a layer of canvas in to thicken it up--we'll see! Now to raid my sewing stash for every inch of boning I have, and I'll be off! This will be verrrry interesting, as I've never attempted a corset or stays of any type before. I guess I have to start somewhere, and this looks easier than the Victorian corset that's also on my sewing list!

The pattern cut out on the fold.
No, the ticking stripe color does not match the teal.
No, this does not bother me.

They do not call me "She-who-starts-189-projects-at-once-and-thus-finishes-them-all-very-slowly" for nothing. (Well, if anyone did, it would be warranted anyhow...) In my defense, I'm over half done with my patriotic apron star appliques, and got a good chunk of the hemming done earlier. I still plan to have it done for Hastings, as well as my new hat! The new stays will be more of a side project, for when I'm not busy with Civil War sewing.

One last bit of news: I am currently in the middle of a giant Horatio Hornblower binge, having been introduced to it by a friend. So good! Highly recommended. I like it even better then Sharpe, though they're both great Napoleonic Wars dramas.

Sunday, May 20, 2012

Sewing Update

I'm almost done with my Garibaldi! It has reminded me that sewing in sleeves is my least favorite thing ever... it's not tricky, just plain tedious. But now all I have left is one button hole on a sleeve cuff: victory is mine! It has also occurred to me that I should have a corset cover, since it's pretty sheer. [+1 to this week's long sewing list]. I'll post a picture of the blouse later, along with the finished skirt!

I ordered some more burgundy velvet ribbon for my taffeta skirt, but it ended up being much lighter than what I originally had. I think I'll tack it on now so it at least looks complete, and continue to look for a better match later. (Or I could attribute it to war shortages, like my mismatched wrapper buttons? I am a relocated Southern civilian, after all...)

You can see it especially well on the back.
Mine is waaay browner :(

As costume dramas are a must for sewing weeks, I was happy to discover the Sharpe series, which I hadn't checked out until now. I absolutely love war movies and period films, so this series is right up my alley! 14 episodes of Sharpe, all of which are at my library = this week's sewing entertainment.

Meet my new sewing companion.
*whistles*

Back to sewing! Greenfield Village, t-minus 5 DAYS!

Tuesday, May 15, 2012

Plaid/Waist/Garibaldi Outfit!!

Here is the background of my latest full outfit. To start off with, here's a Godey's plate from August 1862. I'll be sporting it starting in the end of May '62, but that's close enough as far as I'm concerned. Besides, I'm sure it will be worn in August as well!

See the lady in the middle with the black waist and
pink skirt? Bingo! That'll be me, with a few alterations...

Here is a similar photographic representation:

Hartford, Ct
Think this, except with a plaid skirt
with a big-ish pleated hem. It'll be rockin'.
(I also like the same-color bodice and skirt...
maybe for another outfit someday?!)

I really like the Swiss Waists with the shoulder straps, and happened to have some extra burgundy taffeta lying around. As soon as I realized how well it would go with my new plaid skirt... destiny! Looking at some other period examples of similar waists, I chose to do a neckline closer to the photo than to the plate. And a little bias-cut self trimming never did anyone any harm, additionally evidenced by this stylish young lady. I also find the little bowtie on the tintype completely adorable, and plan to add one to my finished outfit.

The final result will largely be a cross between these two images: the contrasting waist and trimmed skirt from the plate, and the shape and decoration of the waist from the tintype. I'm so excited!! The waist is all cut out, but I haven't started assembling it yet. The plaid skirt has a couple of feet of pleating left to set, but all of the fabric is cut and hemmed. I ran a couple feet short on velvet ribbon, but reinforcements are in the mail and should come by this weekend. (Boy, did I undershoot for this project... I usually overestimate, not underestimate!) I have to put another sleeve on my garibaldi blouse, and shorten the one that's already on, as it's a little longer than I would like. All in all, there's a bit left to do, but it's definitely manageable, as I have over a week left. Hopefully I'll also have time to touch up my black swiss dot dress as well, so I can debut that too!

1862 trendiness, here I come!

Monday, April 30, 2012

Black Sheer Dress!

I made a black sheer at the end of last summer, but haven't gotten to wear it yet. All I have to do before it's finished is to tweak the fitting on the bodice, add a few final hook and eyes to the under-bodice, and self-trim it a bit. I'm super excited to debut it this season (hopefully one of my events will stay under 80° since it is black... doubtful, but I can hope!) I'll hopefully take some photos of it once I'm home from school at the end of next week.

Here's the dress that inspired it: (photo was swiped from Historical Sewing's post)

Gorgeous, right?!

I used black dotted swiss, because I had been actively looking for an opportunity make something of that fine fabric :) Mine has bishop sleeves instead of the pagodas that Princess Helena is sporting, and I didn't add the tucks at the bottom of the skirt. I'm thinking of trimming it with black ribbon where the tucks would be, though, to achieve a similar look without the extra yardage. Aaah I just adore this dress!

After finals are done, I'll be working on this, and my aforementioned plaid taffeta skirt/Garibaldi blouse/burgundy Swiss waist outfit.

And now... back to the insanity of show week followed by finals! I just bought an arm and a leg and several fingers' worth of frames, mat board and glass... I'll have to get to working when I get back home so I can continue to finance my sewing addiction!

Sunday, March 18, 2012

Kalamazoo 2012!

For those of you in the Midwest, you've probably heard of and/or attended the Kalamazoo Living History Show. I went yesterday with my friends that I Civil War reenact with, and had a few fun finds!

Red linen (a yard for $2--score!!), white linen,
yellow and blue embroidered cotton, and a new fan.

I also got some teas, a pair of rooster sewing scissors for my mom, and some seed beads which will probably be woven into something for Civil War. The total damage was just under $30, which I was quite pleased with!

I've been looking for red, white, and blue linens to make a patriotic apron like this one that I found in the Custis Lee issue of the Civil War Times magazine: (he was on the cover recently... I don't remember the month, though.)


Great, yes? I love the variety in size of the stars--it gives it a really great handmade feel. The original is silk, but I'm making it in linen so that I can use it for cooking, etc. in addition to decorative purposes. I reenact as a relocated Southern civilian sent north to live with family for safety. Patriotic aprons were all the rage last year but they were all Union, which comes as no surprise as I live in Michigan. I think it will be fun/interesting/instructive to have one from the other side walking around too! Now to find at least semi-affordable blue linen...


The fan has been dubbed Adelbert Ames after the Union General, in keeping with the color. He's so pretty and glossy... I can't wait to bring him to a reenactment!