Showing posts with label Civil War. Show all posts

Sunday, April 21, 2013

Civil War Research!

Sorry the blog's been so quiet--I haven't had time for any sewing or reenacting-related things recently due to my insane school schedule. I'm doing a bunch of research/writing for my undergrad thesis, looking at the cultural roots of the United States Sanitary Commission and its relation to domesticity. The whole project has been really fascinating so far, and has given me some great new insights into the period.

A local USSC office in Ohio

Would anyone be interested in a few posts on mid-19thC American culture and/or the USSC? My findings have been really improved my understanding of the middle-class civilian/woman, and will likely be incorporated into my impression. (Although they may be below the surface... it just helps me to better project the persona if I know what I should be "thinking".) Researching for class and for living history at the same time is one of the great side-benefits of a history major!

Sunday, April 7, 2013

Summer Plans

No makeup or nail polish for me this summer...*

I'VE BEEN ACCEPTED AS A LIVING HISTORY INTERN AT HARPERS FERRY NATIONAL HISTORIC PARK!!!

THIS PLACE!!!

AAAAAAAAAAAAAAAAAHHHHHHHHHHH!!!!

AAAAAAAAAAAAAAAAAAAAAAAAAHHHHHHHHHHHHHHHHH!!!!!!!

AAAAAAAAAAAAAAAAAAAAAAAAAAAAAAAAAAAAAAAAAAAAAAAAAAAAAAAAAAAAAAAAAAAAAAAAAAAHHHHHHHHHHHKLASDFJHASKDJFHASLDFKJDASHFJSDALHFJKSADLHFJAKSLHFJSDKALFHJKDLFHJSAKDLFHJASKDLHF!!!!!!!

In case you can't tell, I'm a little excited. I applied last year, but no cigar. I decided to give it another shot this year (hey, why not... all it costs is a few sheets of paper and some postage), and shipped my resume, cover letter, and references in. Exactly one day short of one week later, I got a phone call--I was in!

I HAVE LITERALLY NEVER BEEN MORE SURPRISED IN MY LIFE
I GET TO LIVE IN DOWNTOWN HARPERS FERRY
IN A 19TH CENTURY BUILDING IN THE HISTORIC DISTRICT
WEARING PERIOD CLOTHES ALL SUMMER LONG
PERFORMING PERIOD TASKS ALL SUMMER LONG
WHERE JOHN BROWN'S RAID WAS
AND WHERE JACKSON AND HILL AND STUART HUNG AROUND
AND WHERE LEWIS AND CLARK WENT THROUGH
AND WHERE WASHINGTON DECIDED TO PUT AN ARSENAL
AND WHERE THOMAS JEFFERSON'S FAVORITE SCENERY WAS
AND A TON OF OTHER HISTORICALLY SIGNIFICANT THINGS
WHERE THE POTOMAC AND SHENANDOAH RIVERS MEET
IN THE BEAUTIFUL BLUE RIDGE MOUNTAINS
A HALF HOUR AWAY FROM ANTIETAM AND FREDERICK
AN HOUR AWAY FROM GETTYSBURG AND DC
ABSORBING EVERY PARTICLE OF KNOWLEDGE AVAILABLE
LITERALLY EATING, SLEEPING, AND BREATHING HISTORY
TALKING ABOUT HISTORY ALL DAY LONG
SURROUNDED BY OTHER HISTORY-OBSESSED PEOPLE
FOR TWELVE GLORIOUS WEEKS

This town completely stole my heart last summer. Now I get to live there!

Literal dream come true. I feel so far beyond blessed by this opportunity! I may never come back. (My friends are literally concerned that they will never see me again...) Well, over the summer this blog will look a bit different than the regular sporadic sewing journal: here comes the chronicle of my internship adventures!

*Five days a week, during the workday anyhow.
**pictures borrowed from elsewhere on the internet... I had them saved, so I don't know where they were originally from.

Wednesday, March 13, 2013

New Ballgown

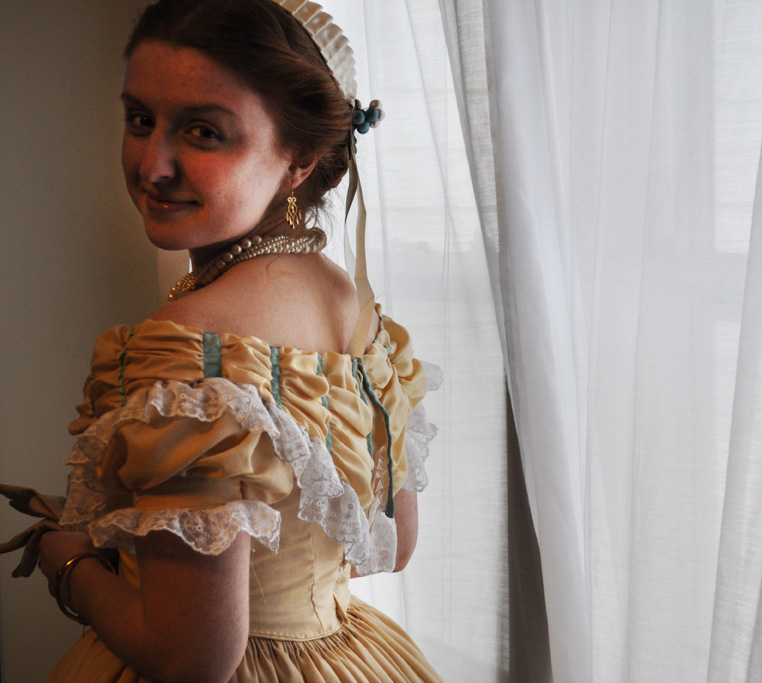
Here at last are photos of my new ballgown, courtesy of my bestie who graciously agreed to a photoshoot during a weekend of crazy homework.

The front, and the bertha-that-I-freehanded-which-
took-a-long-time-but-really-wasn't-that-bad.
Sleeves (which mysteriously got twisted) and the back of
the bertha/bodice/skirt.

Housemates: "If we add a fan, it will be like a legit
modeling shoot!"
Hence, the ruffle blowing in the wind. hahaha

As it was a bit chilly, I donned my great-grandma's fur
wrap to complete my outfit.

This actually wasn't the necklace I ended up wearing, but other than that, this was the ensemble! The dress was enjoyable to wear, and I look forward to pulling it out again for the next ball. Hopefully by that point, I will have added another ruffle or two to the skirt, as was originally intended. It's definitely wearable as-is, but I think at least one more layer on the skirt would be a good thing, and more akin to what I've seen in CDVs and originals.

PROJECT IN SUMMARY:
Fabric: I got 16 yards of silk for $15 + $8 shipping on ebay, and barely used half of it. Lining for the bodice and the kick on the skirt came from the stash.
Notions: Mostly from the stash, plus a few spring steel bones to keep everything smooth. $3
Ribbon: Several yards from Haberman's... maybe another $15 or so
Lace: More from the stash, originally from Hobby Lobby. I really loaded it on, especially on the bertha... maybe 6 yards? (Do you like my super meticulous bookkeeping?)
TOTAL: $30ish. Not too bad for a new silk ballgown!

Friday, February 22, 2013

Ballgown Sneak Peek!

I'll be debuting my new ballgown TOMORROW at the Midwinter's Ball in Lansing! *happy dance*

Here are a few detail shots... pictures of the whole dress coming soon.

Bertha!

Lace on the sleeves

The ill-conceived skirt ruffle

I can't wait to put it all on together and see what it looks like! Living on the edge here, having never worn the dress until the day of the ball...

Sunday, January 27, 2013

It's Ballgown Time!

Note: these posts are being written up with a delay... I didn't get to posting them over break, but have a good chunk of the dress done.

I had been lusting over the pink ballgown for ages, (you know, the one I kept posting pictures of) but had had no luck in finding fabric for it. Wrong weight, wrong color, wrong sheen... I just couldn't get the correct tone, and didn't want to compromise and ruin my vision of the dress. Someday it will be mine--but for now, I am working on another ball gown!

I had been scouring ebay for fabric for ages when I found... IT. Sixteen yards of bone colored, 34"w antique silk. "Good heavens, that must have been extortionately expensive!" you must be thinking. Try $15.50 with $8 shipping. That's right, folks... all the yards I could wish for of high quality vintage stock for a little over a dollar a yard! I won the bid almost without contest. I was close to doing a victory dance, but didn't want to scare my roommate.

What do I do with this glorious good fortune? Well, that shouldn't come as a surprise... it's ballgown time! It's a very light, soft fabric, so anything very structured is out of the question.

Here is my chief inspiration at present:

2012-08-25 KSMF - Sheer white cotton dress with blue satin sash (French), circa 1860.
So light and feminine!

I plan to add more of the contrasting color, and may do a point on the bodice. (I like the ribbon around the waist, but neglected to get the proper width of ribbon while I was at Haberman's, and don't have time for another trip. Rats!) I like the ruffles around the bottom of the skirt. I was originally planning on tiers, but liked the subtlety of the ruffles and how they show off the delicacy of the fabric. Currently, the skirt is made, and the first ruffle is almost ready to attach. Let me tell you... it is taking FOR. EVER. I don't know why, but this project is crawling along at a snail's pace. A tired snail. A tired snail with no motivation. Maybe it's just because I've been so busy otherwise, but still! The bodice is basically stitched together too, but still needs to have hooks and eyes, boning, and piping. So basically everything. 

Pictures of the progress coming soon... hopefully. You know how that goes. First full week of classes coming up... yikes!

Sunday, November 25, 2012

Thanksgiving and a Cravat

The title pretty much sums it up. Between going home, the Thanksgiving festivities, a smattering of other events, and still trying to cram in as much homework as possible, I stayed pretty busy this weekend!

As I positively pine away for sewing while I'm at school, I did fit a few quick projects in while I was home. The first was to hem up a little tree skirt for my mom, which emerged out of a remnant from her stash. After that, the sewing machine was out and threaded, so I decided to keep going. I wanted to make a few cravats for my brother (he just started reenacting, and I couldn't resist the irony of giving him "ties" for Christmas) so I went to the great wealth of knowledge that is the internet and tracked down a tutorial. I found a marvelous one from Sarah over at Romantic History (check it out here!), and after tweaking it a little for a different look, here is the result!

I am quite in love with it!

For the fabric, I used a remnant from my Swiss Body project. The burgundy/black changeable taffeta looks quite sharp in cravat form! It still wants a neckband... I'll add one after I give it to him, to make sure that it will be the right length. I'm planning on making a similar one for myself, too, to wear with the Swiss Body of the same color. It was a quick project--I'd say easily under an hour, even though it was my first one. I'll definitely be making more... lots more! I have a whole stack of fabrics that are now waiting to be transformed into a colorful variety of cravat shapes. Stripes, solids, prints, plaids, single bow, double bow, loose ends, small, large, wide, thin... the possibilities are endless! I have a feeling that my brother will soon have a different necktie for every day of the month. I hope he likes them ;)

Monday, November 19, 2012

New (To Me) Victorian Jewelry

I have been on a bit of an ebay kick lately. As a rule, most of the things I put on my watch list either:
A) Rocket up out of my price range, or
B) Are forgotten about on until bidding has already ended.
However, in the past few weeks, I've been lucky enough to snag a few lovely pieces of Victorian jewelry at a very reasonable price.

Piece #1: Signet Ring

I seriously tried 20 times to get a crisp picture.

This lovely little piece was perfect for me. It was re-sized at some point to around a 6, which fits on my pointer/left thumb. (I have tiny little hands.) And, most excitingly, it's engraved with a lovely letter "E"! Usually, my initials are hard to come by. The condition is lovely, and the detail is wonderful. I am a big fan.

Piece #2: Buckle Bracelet

It's more of an oval shape, but looks round from this angle.
The way it's made, the buckle sits off to one side.

I have been wanting a buckle forever, and couldn't believe I won this one for under $20 including shipping! It's in excellent condition, with a working clasp and hinge and good clear engraving. It's also on the small side, which makes it perfect for my little wrists/hands, as most bangle style bracelets slide right off.

I got to debut the buckle at Wolcott, but the ring didn't arrive until a few days later. I can't wait to sport them together at my next event, which at present looks to be the Midwinter's Ball in February. Until then, I can wear them around with my modern clothes. (Which I may or may not be doing already...) I can't even pick a favorite between the two... I just love them both to bits!

They go so nicely together!

Currently occupying the top slot on my accessories wishlist is a pair of original earrings, but those are reaaaally challenging to find to fit a college budget. I'd settle for a solid pair of repros, but those too are hard to come by. I'll have to keep an eye out--that's paid off so far!

Friday, November 9, 2012

Corset Cover Research

I really need a corset cover to go under my Garibaldi. The way my old corset was made, it didn't peek up much under my Swiss Body. My chemise served just fine as the underbodice, so I never worried about it overmuch. However, my new corset is cut a good inch or two higher in the front, and consequently shows. Thus, I have been looking for a style of corset cover to pattern something after when I'm on break, and can buckle down and make one. Here are some images I've come across that I really like! (Found on Google images and Pinterest.)

Corset Cover
Cool sleeves! But would they get bunchy?

corset cover
I like the huuuge trim on this one! And also the
wide decolletage.

I like these two a lot, and plan to do something toward one or the other. They both have a nice shape, and the lace adds some nice decoration without adding loads of time.

I'll probably *coughdefinitelycough* go with something simpler that doesn't involve hours of embroidery, but I loved these other examples I found and had to post them.

The corset cover
1869. So, a little late. But super cute!

Corset Cover, 1870s
From the '70s, so it's also a little late,
but DANG! I want it. A lot.

Tuesday, October 30, 2012

Wolcott Mill!

Providence shone upon me this year in the form of scheduling, and placed my fall break and the Wolcott Mill reenactment on the same weekend. Usually, Wolcott is the weekend before and coincides with midterms, which puts attending pretty much out of the question. So while I wasn't able to camp this year, I was able to daytrip out for part of Saturday! It was chilly and damp, but I was just thrilled to be dressed and at an event.

Since I haven't done any fall events before, my entire wardrobe is geared for summer weather. I decided to wear the "Black Hole" dress, and accessorized with a pashima shawl, kid leather gloves, a black velvet belt with a mother of pearl buckle, a jet and gold brooch, my little reticule, and my new boots from Jackson. In order to stay warm in my thin cotton, I cheated a bit and layered a black long-sleeved shirt under the dress. I also lived on the scandalous side and went without a bonnet or hat, as it was unseasonably late for straw, and I haven't gotten around to making anything of silk or wool yet. One of these days!

The whole ensemble!

The military portrayed the Battle of Sheperdstown, fought just after Antietam in September of '62. I was there for Part I, by the end of which the Union had swept the field. (According to my history, however, the ultimate victory in Part II went to the South.)

The Confederate skirmish line towards the beginning of the battle.

Overall, it was a lovely event. I hope to camp for this one after I'm done with college and can take a weekend away without worrying about the piles of homework I'm leaving behind. Until then, I'll have to start in on some warmer clothes. My purple plaid is pretty thick. If I let out the hem on that (which I have to do anyhow) and make a coat/cloak, hood, muff, and some flannel underpinnings, I should be ready to brave the October weather!

Sunday, October 28, 2012

New Corset!

[Sorry for the long hiatus! I've been totally swamped with school, but now have a few posts to put up. This one's been written up in the queue for a while, but I just now finally got around to sticking the pictures in.]

Towards the end of the summer, I put on my corset to get ready to docent at my historical village, for which I dress to the Civil War era. I snapped the busk together and proceeded to pull on the lacing. Without too much tugging it stopped tightening, but wasn't nearly snug yet. I checked in the mirror, and sure enough, it had finally laced up all the way in the back with room to spare. Not good! With the Jackson reenactment approaching (the enormous crowning jewel of the summer reenacting season) I did not want to be parading around in an ill-fitted corset, which correspondingly would not support my back and hoop. So I finally got on the ball, and called up my friend to help me whip up a new one. It was a bit of a whirlwind, (hence scant/nonexistent process photos) but here is the general rundown of the project:

Stage 1: Mockup
Pretty self explanatory. I used my friend's pattern as we're a similar size (I'm a little shorter and rounder, but it worked just the same) and cut out the mockup in a fabric that doesn't stretch. I was confused as to fitting something with two closures with a projected gap in the back. Solution: sew a 2"-3" strip in the back where you want the lacing gap to be, and fit the rest as usual. Brilliant!

Many, many pins in the mockup!

Stage 2: Cut out all 34857 pieces
Seriously, there are that many. Gussets here, gussets there... and every piece needs to be cut out in all of the different fabric types. (Lining, canvas, and outer fabric, with more optional fashion fabric.) Snip away!

Stage 3: Sew all 34857 pieces together
3a. Sewed canvas and lining together
3b. Assembled attached canvas and lining
3c. Assembled fashion/outer fabric... partially.

Stage 4: Boning and Busk
Boned the lining/canvas pieces, then attached the outer fabric and stuck the busk in. Not necessarily in that order. This stage closely resembled total chaos. I wound up with a 12" busk, and I think I ended up using 26 or 28 bones total.

Stage 5: Grommets
Ahh. Something I already knew how to do, at last. I used some borrowed awls to make the holes, to avoid fraying that would come from punching holes. Then I stuck in 30 grommets with the Crop-O-Dile that I have stolen from my mom for a countless number of projects.

Stage 6: TRY IT ON NOW
For real. So important! Mine ended up getting a full couple of inches longer after it was boned. Like, I-can't-sit-down-in-this-long. A few bones also hit in uncomfortable spots. (ie. jabbing me in the armpit and causing me to permanently hunch my shoulders. Not good!) My dear brother and father cut the bones down to the proper length, and I was able to adjust things so that it fit well. Crisis averted... fortunately before there was casing to rip off!

Stage 7: Casing
I admit, I did not do this stage justice. It was the last step and was getting close to the event. (Like, "four hours" close.) So I whipped some bias-cut canvas casing on with the machine, bent two sewing machine needles by going too close to some bones, and got it together enough to wear.

Stage 8: Lace it all up
I like mine laced in three sections, so that I can easily get it on and off myself as I often have to dress without assistance. I'm not sure how accurate that system is, but hey, it's not visible anyhow! I ended up with 15 grommets per side, which neatly divided into sections of 5 pairs per lace. (I ended up using around 8 yards of lacing, but could have definitely gotten away with 7. Better safe than sorry, though... trimming is always an option!)

Stage 9: Look fabulous, in increased comfort!
I love my new corset! It was in places tricky, tedious, and a little frustrating, but all in all it was very worth it. If it comes down to it again, I'll definitely make another one over buying it.

And here, finally, are some photos!

The finished product. Off, it looks pretty shapeless.
But it's not!!

Purple stitching!

Business on the outside...

Party on the inside! I was talked into using my plaid
mockup as a colorful lining. Here, you can partially see
where I ended up putting my bones. 

EDIT: When I made the corset in August, there was a beautiful, perfect 2-inch gap down the back. I have since lost more weight, and now my new corset is lacing all the way up, too! Agh! I'm happy to have thinned down, though... I can always make adjustments. The side seams are still raw, so I'll probably start by pulling those in a bit where they're not too close to the bones.

Wednesday, October 3, 2012

Evidence of Me in 1861

Hey look: I found a picture of me at Hastings... from 1861!

Strolling down the street, collecting admiring glances
from all the men in uniform. So, business as usual.

Ha! But for real, check out the outfit...

Look familiar?!

This stylish young lady is strolling around Baltimore, MD, boldly sporting a CSA 1st National Flag apron. Adding to her accessories, she has a Colt revolver jammed into the waistband of her apron. I may have to branch out in my accessorizing at events ;)

I was pretty excited when I ran across this in an issue of Harper's Weekly. To see the whole issue and/or a better resolution of this picture, head over to Son of the South here. Or just head over there anyway--Paul has the ENTIRE Civil War run of Harper's Weekly up on his site, among other things. It's so awesome, I have no words for it. Just go.

And while I'm posting about my apron again, I may as well add that it has been updated! I got it some military cuff-size buttons back at Hastings, to add to the Southern feel of the thing.

Ta-daaa!

And I recently found another very similar extant apron, this one being a children's piece made from cotton. It's currently housed at the Museum of the Confederacy in Richmond, and there's more info on it here. Also, it lets you zoom in enough to see stitching and construction details. Super helpful!


This seems to be the most popular style of Southern patriotic apron, which makes sense as the flag is so easily adapted to this form. I really love this piece, though!

That's all for now! I'm hoping to still post here and there, but now that classes are in full swing, we'll see what happens. For the immediate future, I'll be posting project wrap-ups from earlier in the summer that didn't fit into other posts, some research and inspiration, and a variety of other things. No brand new projects for now, though :(

Sunday, September 23, 2012

The Epic Striped Wrapper, Part II

My Epic Striped wrapper made its debut at Jackson. I am a big fan! The frogs are a nice closure, and I'd use them again in a heartbeat. They went on much faster than buttons/buttonholes, and were secure yet easy to get open and closed. It also fits neatly over my hoop, which is a bonus. 

The top. Imagine frogs going all the way to the floor...
Also, it fits me better than my dressform!

I am planning on adding angled welt pockets using the tiny bit of yellow fabric that I have left, and trimming it with the thin navy cording from the sleeves. I also picked up a few more yards, so that I can line the edges of the front panels in the same. And I'll keep on the lookout for a nice navy upholstery cording to replace my improvised ribbon belt. If I can find more of it, I'd eventually like to add a bottom border in the yellow cotton, too.  So while it's not 100% done yet, it's in very wearable condition! It was super comfortable, and I loved the cut of the sleeves for both coolness and practicality.

If you don't have a wrapper already, I can't recommend one enough! They're a must for reenacting, as a state of half-dress is very handy when getting ready can take so long. On top of that, they're fairly easy (depending on the style you choose), and you can pick the craziest fabric your heart desires!

Thursday, September 20, 2012

Remembering Antietam


**I realize that I've missed the Anniversary by a few days. I regretfully had too much homework to do a proper write-up at the time, but am posting it now.

Antietam. It's the battle I've studied most, but I still get a bit of a gut-wrenching shock when I hear the word. There was so much death in so little time, on so little land. Granted, the entire war was bloody. The entire war was tragic. One casualty is too many, because that's a home without a father or a son or a brother. But at Antietam, 23,000 men fell in under 12 hours.

The eastern edge of the Bloody Cornfield

The sun rose over a heavy fog on September 17th, 1862 in Southern Maryland. By the time it set and the fog had burned off the land, it had taken its place as the bloodiest single day in American history. Between a cornfield, a sunken farm lane, a little church, and a small stone bridge, 23,000 casualties were inflicted between the two sides, leaving both armies badly battered. Tactically it was inconclusive, as neither the attacks nor the defense had gone as planned. Ultimately, George McClellan was able to claim a strategic victory for the Union, as Lee's army would withdraw from Maryland in the days following. Years later, history would regard the Battle of Antietam/Sharpsburg to be a major turning point in the Civil War for having shifted the advantage to the Union, and boosting their flagging morale. It opened the door for Abraham Lincoln to issue the Emancipation Proclamation, changing the very face of the war itself. History's course was altered dramatically, yet again.

Burnside's Bridge, site of the third and final phase of the battle.

As we mark 150 years since that warm September day, I propose that we take just a minute to think of those 23,000 men as more than a number. Some fought for ideals while others fought for pay, but by and large, ordinary soldiers on both sides fought not primarily for politics, but for country, family, honor, and loyalty. The soldiers and civilians alike of the War Between the States deserve more than a mention in a textbook here and there--their legacy is a part of American today, whether it's realized or not.

The Bloody Lane in the evening

"History never looks like history when you are living through it."
-John W. Gardner


Friday, September 7, 2012

Surprise!! A Shot of the Finished August '62 Outfit!

You thought I forgot, didn't you? Well maybe I did. Of course I didn't! Here, at long last, is the Plaid Skirt/Swiss Body/Garibaldi Blouse outfit all together!

Lookin' a little rough at the end of Jackson, there...

I finally got an okay shot of it all together. (It's pretty impossible to assemble correctly on the dressform, as the Swiss Body is so exactly shaped, and my form has no shoulders.) The other times I've worn it, the sleeves were rolled down and buttoned, and I had a little burgundy velvet bow at my neck like in the original plate. (In other words, it looked a lot closer to the original inspiration!)  Also, the picture makes the skirt look oddly small, whereas in reality it's HUGE. But here you can get the idea!

Verdict: LOVE IT!! It's a comfortable, fun outfit to wear. The taffeta in the skirt is stiff enough where if it's hot, I can get away with no over-petticoat. The waist is only about half-boned, but at that it lays nicely and I have no bunching problems. Next time I'm going to pin the blouse down to the skirt though, as it kept bunching up when I raised my arms. (Hence, the bunchy top of the blouse sticking up in the photo.) All in all though, I'm a major fan. I made the swiss body by making a toile of my ballgown bodice and doing some serious carving to get down to the shape I wanted, and shifted the lace-up to the front. Worked like a charm! You can't see it here, but the blouse is a sheer and solid white stripe, which was a curtain in a previous life. Nice and light... but I really should make a corset cover to go with it. *Adds it to the list*

Total project cost:
Blouse:
Old curtain: $2 at a garage sale
Buttons: Stash
Total: $2 and change
Swiss Body:
Burgundy/Black shot taffeta (stash, originally around $6 at Jo-Ann's red tag sale)
Grommets (also stash)
Ribbon lacing (also stash)
Boning (also stash!)
Total: Free from the stash!
Plaid Taffeta Skirt:
Taffeta: Jo-Ann's red tag again! $16 for 4 yards
Velvet Trim: Some stash, had to order about $4 more
Hook and Bar closure: (stash)
Total: $20
Outfit Grand Total: $22

For all of the pieces that it needed, this outfit went together very inexpensively! Here's the original fashion plate again, from August of '62. I was in high style sporting something out of this month's Godey's!


Thursday, September 6, 2012

Jackson!!!

The Jackson Civil War Muster is the biggest event in the state (maybe even Great Lakes region?). It's big. And fun. While it isn't as picturesque as Greenfield Village, or as across-the-board accurate as Charlton Park, it's still a great event. It's the place to be if you're looking to do some shopping at the sutlers. And the battles... aghh the battles! They definitely rank at the top of the local events I've seen. The park re-landscapes the field each year for the selected engagement. In years past, they've grown corn and wheat, dug out huge embankments, and lined up trenches to name a few things. This year the landscaping was pretty tame. The battles represented were 2nd Manassas and Stones' River. New as of this year, they split the battles into two phases, one early in the action and the other showing the conclusion of the conflict. It was a nice effect, as it gave a better feel for the whole thing and how it was won or lost. My favorite part was during 2nd Manassas, when the Confederates ran out of ammunition and repelled a charge by throwing rocks, which was a first among the reenacted battles I've seen!

The guest of honor on Saturday was Mr. Harold Becker, whose father fought in the Civil War. Nope, that's not a typo: his father was in the war 150 years ago. "How?!" you ask. His father, who lied about his age in order to enlist, was 71 years old when Mr. Becker was born in 1917. Thus, the 150-year bridge. Awesome? Awesome.

Mr. Becker, me, and my handsome bro-han.

As I mentioned, the sutlers at Jackson are quite numerous. I didn't do too much in the way of purchasing, but did get a new pair of boots which I have been badly needing, and a small gold [can't remember name!!] to fill with lavender and hang from my belt :)

Aren't they cute! They're quick to get on and off, too :)

It's pretty tiny--only about 1" across!

And now, I can't wait for the next event! I was hoping to hit Wolcott Mills in October, but it's not looking good judging by the syllabi I have been receiving this week. Hopefully I can still at least daytrip!

Thursday, August 30, 2012

Parasol Photos and Jackson!

Well, I fell off the face of the earth for the past week and a half. Sorry for the long wait on the parasol photos... here they are, in abundance! It was a nice day, so I trotted outside with Oswald (my faithful camera) and had a shoot.


Ta-daaa! This parasol is like my child ;*)

The still-bunchy insides :/

Folded up and ready to hit the road!

I can't get over the original lace!

The end. (Pun intended!)

The lining still isn't the best [insert understatement of the century] so I'll probably end up fiddling with it some more, eventually. For now, it keeps the sun off and looks super stylish, so I'm satisfied with that! Many ladies were quite envious of my Chantilly shade :)

The Jackson reenactment was this past weekend, which accounts for my absence. In the past couple of weeks, I have:
- Recovered the parasol
- Finished The Epic Striped Wrapper
- Re-set the cartridge pleating on the skirt of the blue and white plaid
- Boned the burgundy Swiss body
- Other miscellaneous maintenance and adjustments
- Made an entire new corset

Surprise! Yes, I just cranked out my first Victorian corset. The one I was wearing didn't fit too great (as it wasn't fit to me) and was too large to the point where it laced up all the way in the back and was still not nearly as tight as it should be. My very knowledgeable friend came over for a few sewing sessions/lessons and showed me how it was done. Look for another post about the corset experience after the JACKSON post, which will be next :) So many posts in the queue right now... be excited!!

Friday, August 10, 2012

Recovering the Parasol, Part I: Restoring, not Destroying

It is a truth universally acknowledged that it is terrifying to take scissors to an antique, with the intention of dismantling it. Here is a diagram of this horrifying process: 


Nevertheless, I took my tiny Ginghers to the parasol, in an attempt to get the silk off. The whole time, I muttered to myself, "I am restoring, not destroying!" It was only moderately comforting, but after a few minutes, the shock of cutting into an original piece wore off somewhat.

Phase 1: Separate lace and silk.
They were sewn together near the end of the spikes. A dozen or so snips, and the lace was free! Now we get a better picture of the condition of the silk canopy

Destroyed side

Not so destroyed side... looks like a pattern piece to me!

Phase 2: Remove silk from parasol
This took a little longer. Both the top silk and the lining were securely stitched to little holes in the spokes (will be handy later!) and to a few points up the line. Nevertheless, this went pretty much without incident. Since the lace is quite securely fastened on, I decided to leave it be and just attach the silk under it, if possible.

No more silk! Except for the little guards on the spokes,
which are still intact.

Next step: use the extant silk to make a pattern. There are salvageable panels from both silk shapes, so it shouldn't be too bad... I hope! My trip to Haberman's yesterday furnished me with the material for the new canopy. I happened to find silk in exactly the same color as what had come off the original! (I should have enough of it to line it, too, should I decide to do so in the same color.) It also furnished me with the gumption to get this show on the road! My frog closures for my wrapper also finally arrived in the post yesterday. Now, I have to get these two projects cranked out so I can get going on the rest of my pre-Jackson sewing madness!

Wednesday, August 8, 2012

The Parasol of Destiny!

When I first started reenacting, I didn't realize how crucial it was to have a parasol. Laugh if you will--it's pretty much a necessity! Once you've used one for ten minutes and realized that having your own portable shade cools you off a solid ten degrees, you're spoiled for good. I've been meaning to get one for a while now, but hadn't run across any in the right style/price. Finally, I caved: I had some birthday money, and was getting one before my next event no matter what! I stalked eBay for a while, until I found... IT. The parasol.


I've always loved the lace ones, but they're always significantly more expensive than their plain silk counterparts. This one, with the carved handle to boot, was the most spectacular one I'd seen up for sale anywhere near the double digit price range. I stayed up late until the bidding came to a close, and won it for only $65!

I then ran around the house and told my brother how fashionable I was about to be approximately 62 times. It finally came the other day, and now I have to set to work on it so it's ready for Jackson at the end of the month. The ivory silk needs to be completely replaced, but the original lace is in very good shape minus a smattering of small holes that can be easily fixed.

Here are a few more shots of it, because I'm in love:


The underside, showing off the carved
handle and the lining.

Even the finial is carved all fancy-like!

Isn't it delightful!
(This shot makes the lace overhang
look longer than it really is.)

I've seen other originals lined in a light pink, and am considering something along those lines, depending on how ambitious I'm feeling once I reach the fabric store. A trip to Haberman's in Royal Oak tomorrow should supply me with the necessary materials... now if I can only get the pattern mock-up to go smoothly!

Progress posts will be made. Stay tuned! :)